Every month, for the past couple of years, a group of us has been meeting on Zoom to try out new techniques, revisit older techniques, as well as to discuss art products we might not have used before, or that we have but don't remember what to do with them?!
We decided to share our experiences on a blog and that blog is called,
This is our Group of Seven!
For our first post - we are showcasing the Creative Heat Embossed Backgrounds technique. You'll find the full tutorial over at Group of Seven Cardmakers but I will show you how I made my cards below.
I made two cards using the same powder for each background. First I'll show you the cards and then I'll walk through a few steps on how they were made.
For my background, I used Frantage Embossing Powder - Shabby Blue which is already a mix of fine sparkly blue, thicker white and gold bits. (there are some
Frantage powders still available on Amazon)
I applied my Versamark with a crumpled up piece of Saran Wrap, pressing it into the Versamark pad and then dabbing the Saran Wrap on the cardstock - I found that gave a better smooth random pattern than using a piece of sponge (which I tried first!).
Because this embossing powder has some light and some heavy bits, I heated the card from underneath so it didn't just blow all the powders off the panel. Once the powders were starting to melt, I finished melting the powders with the heat tool facing the front of the card.
I made two panels - as you can see, when you dab randomly you get different coverage each time. I used the one above on the birthday card and the one below on the butterfly card.
The Butterfly card
I die cut this (large) beautiful
Perspective Butterfly from TH/Sizzix out of Robins Egg Bazzill card, randomly dabbed Versamark over it and embossed with the same Frantage Shabby Blue Powder.
The larger pieces of powder didn't stick to the small areas of the butterfly, so I just used my heat tool on the front to melt the powder as it would not blow away.
I adhered the butterfly over the embossed panel and clipped off the pieces that went over the edges of the card.
The Birthday card
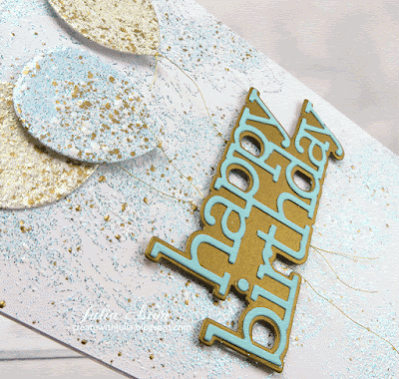
I die cut the sentiment out of a bronze paper and the 'happy birthday' from the Robins Egg Bazzill used on the butterfly. I die cut 3 balloons, embossing one with the Frantage Shabby Blue and two with Frantage Shabby white for contrast. Two of the balloons and the sentiment are up on foam dots.
This close up shows the thin gold threads I tied onto the balloons and laid beneath the sentiment.
Then I tried embossing on a black background with Frantage Shabby White Embossing powder and created this card using the same technique as above for sponging the Versamark on the card and heating up the powder.
The snowflake and skate are both from Sizzix and they are up on foam dots.
Close up of the mix of colors and textures in the Shabby White Frantage Embossing powder.
It really sparkles as well!
You'll find a complete tutorial for the technique as well as beautiful creations by the rest of the Seven Cardmakers using Creative Heat Embossed Backgrounds over at the
Group of Seven Cardmakers blog!
We'll be posting a new technique on the 28th of each month! We hope they will inspire you to try the technique out every month as well!
I'm linking my Birthday Balloon card to:
I'm linking my Ice Skate card to:
Winter Fun
Snow
Butterfly and Birthday Cards
Stamps: unknown
Paper: White - Papertrey Ink, Robins Egg - Bazzill, Bronze from stash
Ink: Versamark
Accessories: Perspective Butterfly die - Tim Holtz/Sizzix, Happy Birthday die - Simon Says Stamp, Birthday Balloons die - Papertrey Ink, Saran Wrap crinkled up, Frantage Embossing Powder in Shabby Blue and Shabby White - Stampendous, gold thread from stash, foam dots, heat tool.
Snowflake Skate Card
Paper: Mixed Media Black - Strathmore white - Papertrey Ink.
Ink: Versamark
Accessories: Ice Skates Bigz Die, Snowflake 3D Embosslits Die - Tim Holtz/Sizzix, Frantage Shabby White Embossing Powder - Stampendous, silver embossing powder on skate, black marker (coloring sole and heel of skate), foam dots, Metallic Stickers Holiday Talk - Tim Holtz/Idea-ology, red/white twine


.png)
Your cards are so beautiful with these backgrounds, Julia! Especially love the soft colours of the frantage powders on the first two. The butterfly and the balloons look fabulous over top of the heat embossed background. Your winter card is awesome. I love the pop of the white snowflake and skates against the metallic embossed black background. So dramatic! xx
ReplyDeleteHi Julia ... your cards are just AWESOME! What a fabulous group of crafters ... I recognize several of them and am always inspired by their designs that they share on my various challenge blogs ... what a fun idea you ladies have come up with! I'll be checking in as much as possible!
ReplyDeleteThanks so much for joining in the fun at our Double D challenge! Good Luck and we hope you’ll come back often. We appreciate your support!
Darlene
DOUBLE D
DAR’S CRAFTY CREATIONS
Julia, you made so many beautiful cards with this technique. I love that combo of pale blue and tan, and your Christmas card with the skate is gorgeous ♥
ReplyDeleteThe Shabby Blue mix of Frantage looks so pretty as a background Julia and I love the added beautiful balloons and butterfly, the shabby white on black card works brilliantly with the snowflake and the skate, and love the baker's twin through the eyelets in the boot for a pop of red. Great inspiration using this fun technique. x
ReplyDeleteWhat gorgeous textured cards, sis! You really embraced the idea of sharing how we did the technique, how it worked, and the results. I will try to take a cue from you for our future zooms because that's the whole point of the blog Loll set up. Well done!! Hugs, Darnell
ReplyDeleteI am still oohing and aweing over that gorgeous butterfly and the background done with the Frantage. I have some of that powder and need to get it out and use it! Your birthday balloons are very festive. The embossing on the black is stunning and so is that snowflake and skate! Such a fun technique, my friend!
ReplyDeleteWhat a gorgeous batch of cards with that technique, Julia! That butterfly is stunning but I love the skate and balloon cards too!!
ReplyDeleteYour cards are all beautiful. I especially love the light blue of the butterfly with that random embossing behind it. Love the technique using saran wrap. I've used it before to stamp BGs wth but never to emboss one. Am going to try it tonight. Beautiful cards.
ReplyDeleteThree beautiful cards, Julia! The butterfly one is absolutely stunning - love the way you toned down the blue of the cs with the Shabby Frantage. Its background and the one for the balloon card both turned out so well. The third card is a wonderful Christmas / winter card - love that large snowflake and the ice skate.
ReplyDeleteJulia, thank you for sharing the steps for this technique! Your butterfly card is really stunning! And thank you for joining STB with the balloon card! I love that ep, frantage, I may even have some in my stash.
ReplyDeleteAwesome wintry fun...that laced up skate is fantastic!! Way to go shopping your stash…thanks for playing along with our “winter fun” challenge over at Shopping Our Stash!!
ReplyDelete– Deb Horst, DT #SOS488
Oh Julia, you nailed this. That butterfly is awesome. I love the frantage on the birthday balloons, it is a stunning card. The ice skate card is just beautiful. What a wonderful group of cards you made.
ReplyDeleteI am loving all the examples of this technique and your cards are some of my favourite. I think we will all be having a go now. fabulous work xx
ReplyDeleteI am in awe with that butterfly, Julia and then the balloons look just magical too! I am so glad you linked up with us at Seize the Birthday as now I can go check out the Group of Seven cardmakers site! Thanks so much!
ReplyDeleteFabulous cards. I love the texture and all the die cuts. Lots of wonderful work here and great take on the challenge. Thanks so much for playing along with us over at Double D. Hope we see you back again soon!
ReplyDeleteJudy~ DD DT
What a lovely idea and how lucky to be part of such a group. It's certainly a good idea to revisit old ideas as well as the new (and use your stash, of course 😄). These are interesting techniques you have used to great effect with different looks on black and white. Thanks for Shopping your Stash with us this time.
ReplyDeleteOh wow I love that very cool and totally realistic ice skate! beautifully done! Thanks for SHOPPING YOUR (Winter Fun!) STASH with us this fortnight!
ReplyDeleteDelightful and stunning cards, love the frantage x
ReplyDeleteThese are wonderful Julia - I really love that off the page butterfly card! Thank you for sharing, I must try this technique!
ReplyDeleteHugs Kate
All three cards are sparkly and awesome, Julia!
ReplyDeleteThe Frantage Shabby Blue Embossing for the butterfly and the balloon cards is so pretty, and the die-cut big, intricate butterfly is gorgeous!
The Frantage Shabby White Embossing on black has an icy feeling and perfect for the snowflake and skate. Thank you for your detailed explanation with pictures! It's great to see you in the Group of Seven Cardmakers. Looking forward to your February card!
Hideko xx
Terrific threefers showcasing this interesting technique. Love the shine and sparkle.
ReplyDeleteThat butterfly is so gorgeous! I love how it takes up the entire card front. And I recently got that ice skate die cut and can't wait to use it. I love your card.
ReplyDeleteFabulous cards, Julia! I particularly like the balloons - love the colours and texture. I may need to dig out my Frantage powders! Thanks for playing along with us at Seize The Birthday 🥳
ReplyDelete