This month Eileen Hull's Inspiration Team is creating Celebrate the Great Outdoors projects using her dies.
For my project I've created a vignette of a Camp Site - using her retired (unfortunately!) Travel Trailer Die. (you may find it on Ebay or Amazon). I used her House Pocket die for the windows and door on the trailer and her Gift Box Scalloped Die to make the base and back piece of the scene.
I have tons of photos I'm excited to share.
Here first, are views of my finished camp site.

I cut additional 'tires' out of black cardstock and punched smaller circles of silver for hubcaps. Then I adhered the tires on the inside of the trailer as shown below.
Here it is from the front, you can see the tires
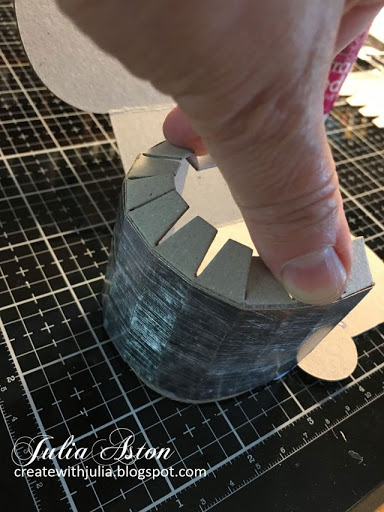
I folded up the tabs and adhered one end to the trailer as shown, curving it to fit the edge.
I pressed down on the top until the glue took hold.
I thought it would be nice to make a step up into the trailer and after fiddling around with a piece of silver metallic paper, I came up with this simple design
Here's a view from the side
And here it is on the trailer. I glued the 1/4" end piece to the bottom of the trailer under the door.
I used Eileen's Gift Box Scalloped Edge die to create the base and back board for my scene. I cut 3 of the box sides out of matboard and covered them with paterned paper. I wanted the front piece to be the sandy beach and the lake (or ocean) that the campsite was on. I taped the two bottom pieces together with packing tape and then decided to add a full piece of cardboard to it for extra support. I glued the bottom edge of the back piece onto the grass piece angling the sides in to create an enclosure.
I die cut trees from Tim's Village Landscape Sizzix Die and painted them with watercolor paints. I die cut a camp fire and a coaster to put under the steps so no sand would get tracked into the trailer! (I ended up using a different piece of DP for my final mat.
To add a little dimension to my scene, I added some stones to the waterline, a deer and mushrooms around the trees, and I brushed Crackle Accents over the waves. I removed the trailer for these photos so you could see the background. The image panels are from Forest/Stamperia, the sentiment is from Taylored Expressions.
I hope you have enjoyed seeing my little campsite - I really had fun creating it.
Please check out Eileen's Blog every Wednesday in September to see what the rest of the Inspiration Team has come up with for our Celebrate the Great Outdoors projects!
Stamps: Paddle Out - Taylored Expressions.
Paper: Mixed Media Board, White Little Sizzles Matboard- Sizzix, True Black, Pure Poppy, Dark Chocolate, Orange Zest - PTI, Kraft Stock Metallic Silver - Tim Holtz/Idea-ology, Clouds and Grass Paper Pad - Joann, Cottage Stripes and Dots Paper Pad - Memory Box, Beach Vibes Paper Pack - Honey Bee Stamps, River Rock Paper Pad - Provo Craft.
Ink: Obsidian - Altenew
Accessories: Travel Trailer Die, House Pocket Die, Gift Box Scalloped Edge Die - Eileen Hull/Sizzix, Circle Nestabilities, S'more than a Feeling Die - Taylored Expressions, Coaster Die - The Greetery, Bigz Die Village Landscape - Tim Holtz/Sizzix, plastic deer from stash, Neutral Candy Dots - SU, Black fun foam, Art Stones - Prima, Crackle Accents - Ranger, Beacon 3 in 1 Glue, Packing tape, Kuretake Water color paints, Ultra Bond Adhesive - iCraft.


All you'd need is a dog and an awning and you'd have my sister's campsite down to a tee, Julia! What a fabulous project and it looks like you had a lot of fun doing it! So many great details!!
ReplyDeleteYou are so creative and clever Julia and I am loving this fun creation x.
ReplyDeleteI definitely enjoyed seeing your little display Julia, it is just perfect and I agree it would be lovely to be there next to the water at the moment. This really is incredible, I love it! Hugs, Anne xx
ReplyDeleteJulia this is so wonderful and fits the Great Outdoors theme perfectly!!
ReplyDeleteThis is AMAZING, Julia! The camper looks authentic done in silver foil and all those little details, especially the rocks, make this an awesome campsite! Way to go, my friend!
ReplyDeleteWOW! This is incredible Julia! I LOVE all the details you've put into this. What a lot of work, but well worth it. The design is AMAZING!! Every detail is perfect! Great work, my friend! xx
ReplyDeletewow this is incredible! All the details are just amazing.
ReplyDeleteThis is so amazing and so creative! I love it!
ReplyDeletewow Julia what an incredible scene. that camper is so the bees knees :)
ReplyDeleteYou are just amazing! I love everything about this - you paid so much attention to detail! Definitely one of my favorite projects ever!
ReplyDeleteJulia, this is truly a work of art! Every little detail has been thought of- love so many things especially the steps you added to the trailer, the rug and all of the amazing scenery! You are so clever to add the background using the Gift Box die as a backdrop. Wow- just amazing and also a fantastic tutorial! Thanks for the reminder- I need to get my trailer die out again...
ReplyDeleteOh WOW! 😱 Did you hear my jaw dropping to the floor? 😉😂 This was a lot of work, but so worth it because it looks incredible! Amazing details. You definitely nailed the great outdoors theme! Love it!
ReplyDelete