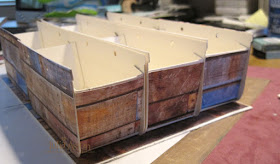
Hi everyone! Today I'm sharing a project I made using Eileen Hull's dies to create a piece to organize and store some of my MANY crafting bits and pieces!
I tucked the name of the piece in each basket from the package label.
I added two Idea-ology Quote Chips to the front boxes.
From the side
I don't think anyone will see the back much - but I wanted to finish it off a bit - so I added die cut woodgrain paper over the basket and inked the added strips along the top (see details below).
Here's how I put it together.
I die cut the pieces to make 6 baskets using Eileen Hull's Basket Die
(I didn't use the basket handles on my project.)
I used coaster board from Stampin' Up for the baskets, which is slightly thinner than matboard.
Then I die cut one cover from Eileen's Journal die out of Little Sizzles Matboard
(slightly heavier than the coaster board I used for the baskets)
as I wanted it to be sturdy to hold the baskets when they were filled with 'things'.
I placed the baskets onto the cover and saw that 6 of them would fit perfectly!
The cover measures 8 3/4" x 5"
I decided to go with a rustic/vintage looking piece - so I used this beautiful distressed barnboard paper from Prima to cover the journal die cut
Then I die cut 4 of the basket piece from the paper and adhered that to the baskets on the front and back. I attached the baskets to each other using the handle holes and small brads.
I attached the baskets to the journal cover base by punching holes with a pick through the center of each box and also through the base.
(being sure I had the baskets lined up evenly on the base.)
I put the heads of the brads on the bottom of the base as I thought the bent down arms might catch on something if they were exposed on the outside.
I rubbed Faded Jeans Distress Oxide Ink onto my craft mat and spritzed with water - then I pressed 8 of the top finishing pieces for the baskets into the ink to color them. I put them on the inside and outside of just the two front and two back baskets to give them a finished look.
I also cut squares of the woodgrain paper to cover the sides of each basket.
And now my little storage unit is ready to be filled with little bits and be stored away until I need them.
They fit right inside one of my storage drawers - the base measures 8 3/4" x 5"
(with more space behind it in the drawer)
Or I can have them out on the little shelf on my worktable if I store things in it that I use often.
So check out your dies and try looking at them with a new eye for innovative uses!
For the month of March many of the Inspiration Team will be posting organizing ideas using Eileen Hull's Sizzix dies - check out Eileen's Blog for all the creative ideas!
Paper: Coaster Board - Stampin'Up, Little Sizzles Matboard - Sizzix, St. Tropez Paper Pad - Prima.
Ink: Faded Jeans Ranger Distress Oxide Ink
Accessories: Basket Die, Journal Die - Eileen Hull/Sizzix, small and medium brads, Tombow Glue, ScorTape, water mister, craft mat, Idea-ology Quote Chips, corner rounder, pick.


That's a wonderful project ! WOW!
ReplyDeleteoxo Susi
That is so fun! I love the project and am amazed by your creativity (although it is nothing new!). The box is an awesome addition to the list of things I'd like to try!
ReplyDeleteJulia, this is such a fabulous storage idea and I love how you can see them through the drawers. Gorgeous papers too! xxx
ReplyDeleteHow creative and such a unique project. Thank you for the step by step and the amazing inspiration. Love your attention to detail too with doing the back x
ReplyDeleteFantastic organization Julia! What a wonderful way to store your supplies! Thanks for the inspiration!
ReplyDeleteJulia, thanks for the step by step tutorial for these cute little boxes. perfect storage containers for your crafts :)
ReplyDeleteThis is practical and pretty, Julia! What a great way to keep those bits separated and easy to find!
ReplyDeleteJulia, this is off the charts cool and creative. What a beautiful and useful project! Love your wonderful mind. <3 Hugs, Autumn
ReplyDeleteGreat storage solution Julia- and plus it's so CUTE! I love that paper- you finished it off so neatly. So pretty!
ReplyDelete