Pages

Tuesday, May 31, 2016

Paper Flowers in a Vase = LOVE

Today I have another project to share as the newest Design Team Member on Eileen Hull's Sizzix DT. 
For the May Design Team projects -  our instructions are to "Create a project tutorial using the new Paper Flower Party Dies or Re-released dies (suitcase, square box, tea cup, bag caddy, 3-D Vase or Candy Drawer"
This time I was able to use three of Eileen's new Sizzix products - Thinlets Die Flower, Rolled, Bigz Die Leaves of Spring and her Honeycomb embossing folder!
Here are a few photos of how I put the flowers together.  I die cut the flowers out of Funky Town DP from PTI and rolled them according to the instructions.  I die cut the stamens and calax of the flower from Summer Sunrise cardstock.
I decided I wanted to have wire stems on my flowers - so I took a piece of Floral Wire 18 gauge that was already wrapped with floral tape, pushed it through the bottom of the flower and glued it to the stamen.  I glued small white Prima Art Stones to the center of each flower.
 Here they are all done, just waiting for their leaves.
I die cut one of the leaves from Eileen's Leaves,Spring Bigz die and then embossed them using Eileen's new Honeycomb Embossing Folder.  This just gave them a little added texture.  I debated as to whether I wanted to sponge all the edges of flowers and leaves with a Distress Ink - but decided to leave them clean and bright!
The wire on the blooms allows me to make each stem longer or shorter and I can bend them forward or back or to the side depending on how I want them to look.
I bought this sweet antiqued vase at Michaels over the weekend -  it was 60% off and I also had a coupon for 20% off everything I purchased so this just cost $3.59!  I added a punched butterfly to one of the bottles and tied a bow of wrinkled seam tape on another.
I'm really happy with how my pretty spring/summer flowers look in these bright colors sitting in this sweet little bottle vase.  The vase measures 6" w x 4" h
Please check out Eileen's blog to see what other DT members have posted there for your inspiration!

I'm linking my project to the following challenges:
Anything But Cute -  Celebrate your style.
The Mixed Media Monthly Challenge - Butterflies and Blooms

Paper:  Summer Sunrise, Simply Chartreuse, white, DP Text Style Funky Town - PTI
Accessories:  Eileen Hull Dies - Sizzix Thinlets die Flower/Rolled, Sizzix Bigz Die Leaves, Spring, Eileen Hull Sizzix Honeycomb Embossing Folder.  Wrinkled Seam Tape - Prairie Bird Boutique Etsy Shop, hot glue gun, Floral Wire 18 Gauge, Martha Stewart Butterfly Punch, White Small Artstones - Prima/Finnabair, Vase - Michaels, Scotch Quick Dry Adhesive.

Sunday, May 29, 2016

Memorial Day Weekend in the US - 2016

Just stopping in to wish everyone in the USA - a Blessed Memorial Day (celebrated on Monday) the day we remember and honor all those in military service who gave their lives to keep us safe as well as all those currently serving wherever they may be stationed around the world.

There is a wonderful field of US flags set up over at the Boston Common - just blocks from where I work - and Friday I took a walk over there to snap some photos to share them here this weekend.
There are 37,000 flags in all - representing every fallen Massachusetts service member from the Revolutionary War to the present. - Quite Impressive.  The display was put up by the Massachusetts Military Heroes Fund.
After walking through the Boston Common -  I crossed the street into the Boston Public Garden established in 1837 and snapped these photos.
The statues of  Mrs. Mallard and her ducklings from the Make Way for Ducklings children's book are there to greet us.
As well as a  new family of baby geese with mum and dad.
and the legendary Boston Swan Boats, established in 1877 - where the driver sits inside the swan and pedals the boat around the duck pond.
We also find George Washington on his wonderful steed.
To finish my celebration -  I thought I'd share a few patriotic cards I've made in the past.
From 2010 
Card details can be found here.
From 2009
Card details can be found here.
Another one from 2009
Card details can be found here.
From 2015
Card details can be found here.
Have a great weekend everyone! 

Saturday, May 28, 2016

Tim Holtz 12 Tags of 2016 - May

I'm just squeaking in before the deadline for Tim's May 12 tags of 2016.  I missed last month and didn't want to miss it again.  
So here is Tim's tag and you'll find all his instructions here.
And here is my version.  I first adhered a couple of strips of Tissue Tape - Symphony and Commute and then stamped images from Tim's Dapper set using Archival Jet Black Ink.  I then applied WV White Embossing Paste through Tim's Gears Mini Stencil and let it dry.  Then I sprayed Ranger Distress Peeled Paint and Broken China Spray Stains onto the tag.  I wiped off the excess and you can see how the Paste and the Tissue Tape resisted the stain.
Instead of making tattered florals -  because of the masculine theme and the gears stencil that I used -  I made tattered gears!  I die cut Tim's Thinlits Gearhead dies out of Paperstash/Crowded Attic.  Then I lightly sprayed the pieces with Peeled Paint and Broken China Distress Spray Stains.  Then I splattered some Antiqued Bronze Distress Stain on to them (the pump on the bronze stain got clogged so I had to dip a brush into it and splatter instead of spraying).  Then I layered different gear sizes together and attached them with a Mini Fastener/Screwdriver slot brad.  I scrunched up the top layers so they were like gear flowers (!)
I colored a piece of Natural Linen Ribbon from Funkie Junkie with the same Distress Spray Stains and sewed it to the tag.  I added a Vial Label with Remnant Rubs/Life Quotes.
  Here's a close up of one of the gear "flowers' so you can see how it's scrunched up
So I'm happy to have been able to get my May Tag done - 
and I'm pleased with how it came out - Win -Win!! (I love when that happens!)
Stamps:  Dapper - Tim Holtz/Stampers Anonymous
Paper:  #8 Manila Tag - Ranger, Idea-ology Paper Stash/Crowded Attic, True Black - PTI
Ink:  Archival Jet Black, Ranger Distress - Ground Espresso, Broken China
Accessories:  Thinlit Gearhead Dies - Tim Holtz, Natural Linen Ribbon - Funkie Junkie, Gears Mini Stencil - Tim Holtz/Stampers Anonymous, Idea-ology - Vial Labels, Tissue Tape Symphony and Commute, Remnant Rubs/Life Quotes, Heart Charms, Jump Ring, Trinket Pin, Mini Fasteners/Screw Driver Slot Brads, Wendy Vecchi White Embossing Paste, Ranger Distress Spray Stains Peeled Paint, Broken China, Antiqued Bronze, foam dots, Scotch Quick Dry Adhesive, sewing machine, white thread.

Thursday, May 26, 2016

Fusion Card Challenge - May 26 - Something Blue

It's the season for wedding bells to start ringing - and the Fusion Card Challenge has inspiration for us if we are in the need of wedding cards!  OR you can be inspired by the colors, the flowers or just the sketch!  Lot's of fun options!
I've been needing more wedding cards for my stash - so I was inspired by the layers of cake and the blue florals - I also used a sentiment banner so that's a little nod to the sketch!
I layered two stitched edge dies over the white card base to represent the layers of the cake.  I was lucky enough to WIN this lovely stamp and die set by Winnie and Walter from the Coffee Lovers Spring Blog hop - and I just love it!  The stamps are two step -  outline and solid color.  I used both on the leaves but only used the outline on the rose, coloring it with a Ranger Distress Marker so I could leave some of it white.  I added some Glitter Clear Wink of Stella for sparkle.
Here's what I stamped on the inside - the sentiment is from a company no longer in business and I stamped the Winnie and Walter leaves above it.
What inspires you this week?  Please join us by linking your card over at the Fusion Card Challenge - and check out all of the wonderful inspiration from the Design Team!

Stamps:  The Big, The Bold and Extras - Winnie And Walter
Paper:  White, Enchanted Evening - PTI
Ink:  Royal Velvet, Spring Rain, True Black - PTI
Accessories:  dies - The Big, the Bold and Extras Cutaway - Winnie and Walter, Stitched Edge Rectangles - Waltzingmouse, Glitter Clear Wink of Stella, foam dots, Ranger Distress Marker Tumbled Glass.

Wednesday, May 25, 2016

May Papertrey Ink Blog Hop

Today I'm excited to be participating in the May Papertrey Ink Blog Hop -  it's always SO inspiring to see what everyone has created from the challenge.
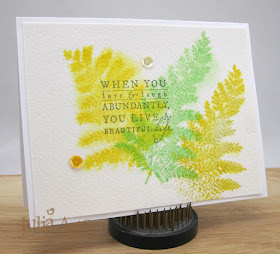
and here's the inspiration -   the challenge is to use Grey Text over Watercolor
I decided to use the lovely fern stamps from Meadow Greens.  First I spritzed a panel of Arches Watercolor Paper with water.  Then I inked up the ferns with Bright Buttercup and Vintage Jadeite Inks and stamped them onto the wet paper.  
I dried the panel with my heat tool and then stamped over the ferns again to put back some detail.  Then I stamped the sentiment from the same set over the ferns using Stormy Sea Ink. 
I love how it came out!  I added 3 Lemonade Blend sequins from Avery Elle and then adhered the panel over a white card base.
 Now I'm off to check out everyone's lovely cards over at Nichole's blog!
Stamps:  Meadow Greens - PTI
Paper:  Arches Watercolor Paper, White - PTI
Ink:  Vintage Jadeite, Stormy Sea, Bright Buttercup - PTI
Accessories:  water mister - Ranger, heat tool, Lemonade Blend Sequins - Avery Elle.

Tuesday, May 24, 2016

A Gardening Tin for my new Design Team!!

I am so excited today to be posting my first project as a Design Team Member for Eileen Hull - the wonderful designer for Sizzix dies.  I have been using her dies for a long time - making 3D projects is one of my favorite things to do - and so when she and Amy invited me to be on her Design Team I didn't need to think twice!  
Plus - my A Vintage Journey  teamies, Anne and Tracy, are already there to welcome me!

-->For the May Design Team projects -  our instructions are to "Create a project tutorial using the new Paper Flower Party Dies or Re-released dies (suitcase, square box, tea cup, bag caddy, 3-D Vase or Candy Drawer"
Being a newbie on the team - I hadn't received the new flower dies yet - but I wanted to join in with a project this month- so fellow Teamie, Anne - was gracious enough to send me a die cut of the re-released Suitcase die (I think another Teamie had sent it to her - so thanks for sharing everyone!!!)
Rather than make my project  like a leather suitcase -  I wanted to make it more like a tin metal gardening box - I was inspired by these boxes found on Pinterest
 Here's my little gardening tin - using Eileen's Suitcase Sizzix Die.
And inside - I have my gardening tools all ready to get digging in the dirt!
First, I'll show you how I started my project.  I spread some WV Metallic Gold Embossing paste sparingly onto the die cut pieces - particularly not covering the edges.  
I used Wendy Vecchi's Faux Guilded technique - you will find Wendy's Youtube video here
After I let it dry overnignt (you can also dry it with your heat tool) - I sponged over all the pieces with WV Archival Watering Can Ink.
I wanted to soften the harshness of the color and so then sponged over all the pieces again with WV Archival Cornflower Blue Ink.  I think it made it look more like old tin.
Then I die cut two of the gardening tools from Eileen's Gardening Tools Set and embossed them using WV Archival Tree Branch Ink and WV Watering Can and Tree Branch Embossing Powders. 
So then I just assembled the suitcase using brads and ScorTape.  I stamped the cone flower from Tim's Flower Garden Set with Archival Jet Black Ink and added some Botanical Remnant Rubs and a Small Talk sticker on the front.
 On the back I stamped these lovely nature sentiments from One With Nature by Simon Says Stamp.  I thought they were perfect for my little gardening tin!
I adhered Regions Beyond Tissue tape between the sentiments on the back and around the side edges of the suitcase.  Even though the tissue tape is  sticky - I used some Scotch Quick Dry Adhesive to be sure it would stay 'stuck' over the embossing paste and ink.
The butterflies are die cut from matboard using Tim's Sizzix Tiny Shapes movers and shapers.  I embossed them using WV Archival Tree Branch Ink and WV Sky Blue Embossing Powder.  The brown ink shows through and gives a lovely antiqued look.
I added panels of  Tim's Wallflower Paperstash inside my gardening tin suitcase - sponging the edges of the paper with WV Archival Coneflower Blue ink.  I added one butterfly to the handle and knotted a piece of black wrinkled seam tape through them.  I added more Botanical Remnant Rubs (find joy in the ordinary & stars)  and a Small Talk sticker (cultivate kindness).
I popped the gardening tools up on thick foam dots.
This sweet little gardening tin suitcase measures 4 1/4" x 3" x 1".
 I hope you will check out the other Design Team members posting over at Eileen's blog today for more lovely inspiration!

I'm also linking my project to:
Anything but Cute:

Mixed Media Monthly Challenge

Stamps:  Flower Garden - Tim Holtz/Stampers Anonymous, One with Nature - Simon Says Stamp.
Paper:  White cardstock, white matboard, DP - Paper Stash/Wallflower/Tim Holtz
Ink:  Wendy Vecchi Archival Tree Branch, Watering Can, Cornflower Blue, Archival Jet Black.
Accessories:  Suitcase die and Gardening Tools Set die - Eileen Hull/Sizzix, Tiny Shapes Movers and Shapers - Tim Holtz/Sizzix, Flat Broke Brads - Bazzill, Idea-ology Botanical Rubs, Small Talk Stickers, Tissue Tape/Regions Beyond,  Wendy Vecchi Metallic Gold Embossing Paste, Wendy Vecchi Embossing Powders Watering Can, Tree Branch, Sky Blue, heat tool, Scotch Quick Dry Adhesive, black wrinkled seam tape - Prairie Bird Boutique Etsy Shop.