So - on the 2nd day Lindsay, who has a great blog called the Frugal Crafter, stopped by the booth and asked if she could take videos of both Anne and I doing our little demos for her blog - how cool!! You can check them out on her post here. Mine is the 2nd video on the post and Anne's is the 3rd - you'll see our names as well as 'Rubbernecker'
When I came home - I went into my craft room and immediately made cards like the ones Anne and I made during the show and on the video - and here they are!
This shows the stamp set (Create a Garden Set #1)and techniques (sponging with two colors and making your own multicolor ink pad) I was using. (The dots stamp is from Create A Garden Set #2 that includes clay pots instead of baskets)
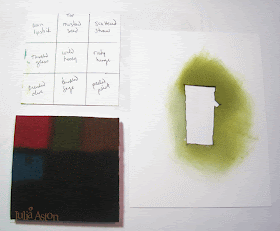
Below is the homemade ink pad I created using Cut n Dry Stamp Pad Felt and Ranger Distress Reinkers - so I could stamp my flowers in multicolors. You can also see the negative mask I made to lay over my basket stamping so I could sponge the 2 colors of green on it (Bundled Sage and Peeled Paint). First I sponged the lighter green over the whole basket - then I sponged the darker green along the top - around and down the right side - and across the bottom - leaving a crescent of the light green on the left side to look like a sun spot.I made the graph shown above my ink pad so that I would know what inks I used if I wanted to re-ink it. I will store it in a ziploc bag and it should stay moist for quite some time. My pad is 3"x3" so each color is 1" square. I just used the eyedropper in each reinker - using about 2 dropper fulls on each square.
I inked the flower stamp at the 4 corners of Worn Lipstick, Mustard Seed, Tumbled Glass and Wild Honey on the pad (top left). For the grasses I inked around the Wild Honey, Brushed Olive and Bundled Sage area.
And here is the card I made using one of the stamp sets Anne was using at the show - Watercolor Poppies #719. It's a two stamp set - there is a solid stamp of the poppies and leaves, and an outline stamp.
So first you color on the solid stamp using Ranger Distress Color Markers. (You could also use inks of course). Next, you mist the stamp with water using a Mini Mister and stamp it on the card. Then you ink the outline stamp in black and stamp it over the colored stamping.
Two lovely cards that work up quite quickly and are sure to impress whomever you send them too!
Basket Card:
Stamps: basket, flower, grass and stem from Create a Garden Set #1, dots stamp from Create a Garden Set #2, Beautiful Wishes sentiment - Rubbernecker
Paper: White, Aqua Mist - PTI
Ink: Versafine Onyx Black, Ranger Distress Bundled Sage and Peeled Paint on basket - colors from home made ink pad listed in post above.
Accessories: Cut n Dry Stamp Pad Felt - Ranger.
Watercolor Poppies:
Stamps: Watercolor Poppies 719, Beautiful Wishes Sentiment - Rubbernecker
Paper: White - PTI
Ink: Versafine Onyx Black
Accessories: Mini Mister - Ranger, Ranger Distress Markers -Spiced Marmalade, Brushed Corduroy, Barn Door, Victoran Velvet, Forest Moss and Shabby Shutters.


Both cards are lovely, Julia. Glad you had a wonderful weekend. Love your cards and the wonderful tip about creating your own multicolor ink pad. TFS!
ReplyDeleteGorgeous cards Julia, I love the inking technique you used, thanks for the tutorial, and the fab inspiration!
ReplyDeleteWhat a beautiful cards Julia.
ReplyDeleteHugs Riet.xx
WOW this is a fabulous post so much to learn,you did a great video, how exciting is that Miss Julia, you cards are fabulous all of them, brilliant idea to make your own stamp pad, I love the idea.Thanks so much for sharing, I'm going to pass along your post, have a great day..
ReplyDeleteSuch pretty cards Julia!
ReplyDeleteJulia, your cards are both stunning and I loved seeing how you made the multicolor custom ink pad! I forget what a beautiful effect you can get with sponge and reverse masking; thanks for that inspiration!! I would have loved to come let you teach me how to use these beautiful stamps! Lucky people who got to be there.
ReplyDeleteHugs!
wonderfull card, love it!!!
ReplyDelete