Pages

Saturday, July 29, 2023

Inkspirational Challenge #295 Stencils

 The latest challenge is up at Inkspirational #295 - Use Stencils with the option of using Layering Stencils!

I used a Layering Stencil called Mini Feathers from The Crafters Workshop.  I inked the two stencils of each feather in Peach and Sea Glass inks overlapping the two feathers .  The card base is white hammered paper so it gives it an interesting texture.  I stamped the sentiment directly over the stenciling.


Please join us and link up your stenciled card over at Inkspirational - where you will also find lots of inspiration for the rest of the team! 
 
You have until August 11 to link up!


I'm also linking my card to:

First time using the stencils and the sentiment stamps!


Anything Goes


Stamps:  In My Thoughts - Altenew
Paper: White Hammered paper - Amazon.
Ink: Peach Perfect, Sea Glass - Altenew, Nocturne Versafine Clair.
Accessories:  Mini Feathers Layered Stencil - The Crafters Workshop

Friday, July 28, 2023

Group of Seven Cardmakers - July 2023 Coloring Dry Embossed Images

Bonnie chose the technique for us at the Group of Seven Cardmakers this month and that is Coloring Dry Embossed Images.  

The three techniques listed over at the blog are: sponging, water coloring and inkpad swipe.   There are also instructions and links to videos. 

I used ink pad swipe on one card and water coloring on two cards.

I  used the same 3D embossing folder on all my cards,  Rose Bouquet from Altenew,  so I could focus on the technique used and not different embossing folders.  It will be fun to try others though and see how they look!  

Tip: It is best to use 3D embossing folders as they give a deeper impression.

Tip: If you do the water coloring technique and the paint goes over the raised edge of the embossing, you can remove the paint with a clean damp paint brush if you do it right away.

For my first card, I embossed on Hammered White Cardstock and simply rubbed an Altenew Misty Morning mini ink pad over the raised embossing.  I stamped the sentiment and popped it up on foam dots.

For my 2nd card I embossed on watercolor paper.  Then I water colored the raised parts in blue and green, drying with my heat tool between colors.  Then I water colored the background with yellow.  When that was dry, I splattered over the panel with a White POSCA pen, then added the printed sentiment up on foam dots.
For my third sample - I embossed on black Mixed Media paper and then water colored with Niji Pearlescent Water Color paints.  These paints really show up and pop off the black background!
It's hard to appreciate the depth of the 3D embossing in the photos above -  so I took the photos below, with the cards laid down, to better show the wonderful dimension!  Makes you want to run your finger over it doesn't it?!


We hope you will try some of these coloring of  3D embossed panel techniques - you'll find lots more inspiration from the rest of the 7 over at The Group of Seven Cardmakers blog.
  
Mr. Linky is set up if you'd like to link up anything you create!  We'd love to see it!


I'm linking my Sympathy card to:
anything goes

Linking my Anniversary card to:
Anything goes


Anniversary
Stamps:  sentiment from Damask Designs - PTI (retired)
Paper:  White hammered card - Amazon
Ink:  Misty Morning - Altenew, Ocean Tides - PTI
Accessories:  3D Embossing Folder Rose Bouquet - Altenew, foam dots.

Birthday
Paper:  water color paper - Canson Cold Press
Accessories: 3D Embossing Folder Rose Bouquet - Altenew, water color paints - Winsor and Newton, paint brush, water, white POSCA Pen, printed sentiment strip, foam dots.

Sympathy
Stamps: Simple Strips: Sympathy - Taylored Expressions.
Paper:  Black Strathmore Mixed Media Paper, white - PTI
Ink:  Brown - Altenew
Accessories:   3D Embossing Folder Rose Bouquet - Altenew, Niji Pearlescent Water Color paints, Simple Strips Die -  Taylored Expressions, foam dots.

Thursday, July 27, 2023

I'm the Guest Designer for Tic Tac Toe #219!

 I am excited to have been asked to be the Guest Designer for Tic Tac Toe  #219 challenge!  And here is the fun grid for you to choose which line inspires you - diagonal, vertical or horizontal!


I went with the diagonal line top left to bottom right : Layers, Die Cut, Anything but a card. 
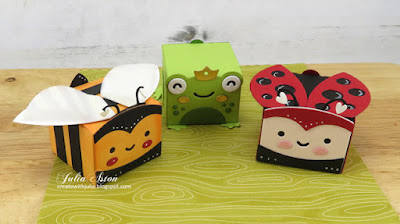
 I made some sweet little treat boxes that measure 1 1/2" x 1 1/2".

I love making 3D items for little gifts and holiday tables.  

I made the ladybug using the Tiny Box Die and Tiny Box Add On Ladybug Dies from Lawn Fawn. 
 
You'll find the Tiny Gift Box die and all the animal add-on dies at Lawn Fawn here.

I added little Tuxedo Hearts to the antenae and some accents with a white Gelly Roll pen.

I used the same lady bug dies for the bumble bee.  I changed the colors and wings and added stripes instead of the side panel with holes in it, so it looks like a bee!  I made the wings for the bee layering a white wing with a striped vellum wing over it, attaching only at the base, since bee wings are usually sheer!
Here's the frog with a lovely gold crown so the princess will kiss him!

The boxes open from the back.  You can fit 3 Hershey kisses inside or any small treat or cash!

So please join us for Tic Tac Toe #219.  And Thank You to the Team for having me Guest DT for this challenge!  

You'll find lots of Design Team Inspiration as well as Mr. Linky here at the Tic,Tac, Toe Challenge blog

I'm linking my 3 boxes to:

they are all made from the same box base


First time making the bee, frog and lady bug.


Lady Bug Box
Paper:  True Black, Pure Poppy - Papertrey Ink, Pale Rose - Bazzill.
Accessories:  Scor Tape, glue, Tiny Gift Box Die, Tiny Box Lady Bug Add on Dies - Lawn Fawn, Tuxedo Hearts - Honey Bee, white Gelly Roll Pen

Bumble Bee Box
Paper:  white, Summer Sunrise, Pure Poppy, True Black - Papertrey Ink,  striped vellum from stash.
Accessories:  Scor Tape, glue, Tiny Gift Box Die, Tiny Box Lady Bug Add on Dies - Lawn Fawn, Tuxedo Hearts - Honey Bee, white Gelly Roll Pen

Frog Box
Paper:  White, True Black, Green Parakeet - Papertrey Ink, Caramel Apple - Bazzill, Kraft Metallic Gold - Tim Holtz/Idea-ology
Accessories:  Scor Tape, glue, Tiny Gift Box Die, Tiny Box Frog Add on Dies - Lawn Fawn.

Wednesday, July 26, 2023

There is a Garden in Every Childhood

 Today I have a card to share that I made using  3 Impatien blooms and leaves from my garden and laying them between two layers of watercolor paper and running them through my Big Shot to 'press' them.

I love doing this with blooms from my garden - some work better than others - and green leaves with all of their chlorophyll work really well. 

The moisture from the leaves and blooms always make the watercolor paper warp a bit - you can see two creases on the panel - one on each side.


I'm linking my card to:
I have 3 real pink Impatiens blossoms on my card


Stamps: Stampotique
Paper: water color - Canson Cold Press
Ink: Nocturne Versafine Clair
Accessories: impatiens from my garden


Thursday, July 20, 2023

Gingerbread Latte Barista

 I'm here today with a shaped Christmas card for a couple of the Christmas Challenges out there.

So I cut Barista Ginger using an older Bigz Die - aptly named Gingerbread.  It cuts the gingerbread person and the white frosting lines.

In search of a Santa Hat - I found the Fresh Baked #1 Thinlit die set that had one that fit perfectly on Ginger's head.

THEN I thought to make Ginger a Barrista serving Gingerbread Lattes at Gingerbucks and found the Coffee Cup die in the Festive Things Thinlit die set!  
(I added a little piece of the frosting die cut to the cup as the steam raising up from the cup!)

And since this is a professional Barrista Employee - I just had to add the eyeglasses that I found in the Cool Yule Thinlit die set.  ALL of these die sets are Tim Holtz/Sizzix.

The sentiment stamps are retired from Waltzingmouse sets - Gingerbread Joy and Coffee Set.

I cut Ginger out of white Woodgrain Paper and sponged with Rusty Hinge Distress Ink.  I cut the coffee cup out of the same paper and sponged it with Gathered Twig Distress.  I punched the buttons and eyes out of red card with a circle punch and added enamel dots to the centers of the buttons - I added white dots to the eyes and then drew black pupils with a Micron Pen (and then added the glasses to make Ginger more professional AND because the eyes looked wonky after I added the pupils!)

I adhered the two sides together at the top of the head, making a score line just below the glue line on the back piece so it would bend out cleanly and Barista Ginger could stand up and not spill the Gingerbread Latte in her hand.


I'm linking my Barista Ginger card to:

Christmas Kickstart 


Santa's Hat

Santa's Hat


Stamps: Gingerbread Joy and Coffee Set - Waltzingmouse (retired)
Ink: Vesafine Clair Nocturne, Ranger Distress Rusty Hinge, Gathered Twigs.
Paper: White, True Black, Pure Poppy - Papertrey Ink, White Woodgrain Paper - Tim Holtz/ Ranger.
Accessories: Bigz Die Gingerbread, Festive Things Thinlit Dies, Fresh Baked #1 Thinlit dies, Cool Yule Thinlit Dies - Tim Holtz/Sizzix, foam dots, enamel dots - Altenew, 1/2" circle punch - Marvy, Memo Punch - Stampin'up.

Wednesday, July 19, 2023

Floral Wreath Birthday

I'm sharing a very easy card today!  

I've been seeing the beautiful Dainty Flowers 12x12 Paper pack from Stampin' Up on several cards over at Splitcoaststampers and just had to see if I could order some - only to find out it's no longer available (!) I don't know when it came out -  BUT - I found it on EBAY (for what I'm sure was a higher price than when it came out )  BUT - I'm happy to have found it -  and here is my first card using a portion of one of the sheets!

So the beautiful wreath that looks like water coloring right??!!  - it's printed on the paper!  I added a die cut Happy Birthday that I cut twice and glued together for thickness.   I also added 3 pink enamel dots, and rubbed the edges of the panel with Gold pigment ink.
    
The design cuts just shy of 5 1/2" so I layered it to a panel of Scarlet Jewel card to make it an A2 card.  

There are 6 of these images plus 2 lines of florals on this 12" x 12" piece - so you could make up to 8 cards with that one sheet!  There are two pieces of this design in the pack.

I love when a fairly easy card to make looks SO IMPRESSIVE!!

I'm linking my card to:

Mood Board inspired by the pretty florals on the china and the dark jam!


Clean and Simple

Using new DP


Paper: Scarlet Jewel - PTI, DP Dainty Flowers 12"x12"pack - SU
Ink: Gold Pigment Ink - Color Box
Accessories: Happy Birthday Die Poe Script - Poppy Stamps, pink enamel dots - Altenew

Sunday, July 16, 2023

Woof Woof!

How cute is this little Scottie dog??!!  I've had this Sizzix Bigz Die for a few years (bought on sale) and then never created with him.  (seems to be a common theme with me??!!)

I was going to put him 'on' a card - but when I took out the die - I realized he was a bit bigger than an A2 size card - so I made him a stand up Scottie dog!  He measures 5 1/2" nose to tail, 5 1/4" ear to foot so he'll fit in a 5x7 envelope or a 6x6.  Maybe he'll need one extra stamp if mailed?!

The eye and nose are little die cuts and I colored them a bit with a white pencil so they would show up.   The collar is also part of the die and I cut it out of black and then patterned paper and glued them together and then on his neck.   I die cut the the holly, layered the berries and leaves and adhered it with a foam dot. The Woof Woof is gold embossed.

I cut him out twice and adhered the front to the back along the tip of the tail and the forehead below the ears.  
Here he is from the back

I scored below the adhesive on the inside piece along the forehead and tail so it would fold back cleanly and he could stand up!  
I added this sentiment inside and will either write on it with a white pen or add a panel of white.

I'm linking my Scottie dog card to:

first time using the Scottie die

Christmas in July

Dogs/puppies


Stamps: Dogs - Inkadinkadoo, inside sentiment: Mini Strips: Christmas - Taylored expressions.
Paper: True Black - PTI, Core-dinations Kraft core green and red, DP Text Style Holiday Cheer - PTI
Ink: Versamark
Accessories: Scottie Dog Bigz Die - Sizzix, Patchwork Holly Die - Impression Obsession, Mini Strips Die - Taylored Expression, foam dots, white pencil, gold embossing powder, heat tool

Saturday, July 15, 2023

Inkspirational Challenge #294 Moodboard - Paris Skyline

 There's a new challenge up over at Inkspirational #294.


I was inspired by the tan/blue colors, the Eiffel Tower and surrounding buildings. 


I used an Elegant Writer Speedball Calligraphy pen Fine Tip 2.0 mm to create the blue/pink haze over the city and around the buildings and sentiment.

You can look up Elegant Writer Calligraphy pens on YouTube to see how they work and how to use them.  Most show drawing with the pen and then using a water pen to activate the colors.  But I used it with stamps and a wet paint brush!

I stamped my Paris skyline with Nocturne Ink onto watercolor paper as well as the Paris sentiment and dried it with my heat tool to be sure it was really dry.  Then I used the Elegant Writer to outline the edges of the images - top and bottom edges as well as some inside lines on the buildings.  Then I used a paintbrush dipped in water and washed over the areas I had used the Elegant Writer on.  

At first it creates puddles of darker blue but when you blot it with a paper towel - it creates the pink and lighter blue look.  It's fun to play with it to see what it does!

I added a rub on sentiment "what a view' below the stamped Paris and a little black clay heart to the i on Paris. (it's not attached yet on the photo above!)

I bought this Elegant Writer years ago after seeing it used on Splitcoaststampers - tried it once then never used it again. (?)  I don't think I liked whatever I did and didn't try playing more with it. (Duh)
 
Something about the look of the photos on the Moodboard made me think of this watery result so I got the pen out to give it another try!

So show us how this Mood Board inspires you and link up your card over at Inkspirational!  You have until July 28th to enter.  Check out the blog where you'll find lots of other DT inspiration!  

Linking my card to:
We Love Stamping - anything goes option


Stamps:  City Scapes - Tim Holtz/Stampers Anonymous, "Paris" from Hampton Arts set.
Paper:  Watercolor paper - Canson Cold Press
Ink:  Nocturne Versafine Clair.
Accessories:  Elegant Writer 2.0 mm - Speedball, What a View Rub On - Tapelogy.com, paint brush, water, Tuxedo Heart - Honey Bee Stamps.