Pages

Friday, November 30, 2012

Day 3 - Dec WMS Sneak Peaks - Open Me First!


Welcome to Day 3 of the Waltzingmouse Sneak Peeks!  Today we are working with a wonderful set called Ornate Ornaments - and boy!!!  are they ever ornate!!  Check out this lovely detail!

I used the largest ornate ornament in the set which includes 4 beautiful ornaments, 10 sentiments, and a snowflake piece that you can use to make an ornate snowflake!  The ornaments can be hand cut or they also fit the Spellbinder 2010, 2011 and 2012 Heirloom Ornaments!  This large ornament fits the Heirloom Ornaments 2010

I love boxes, and I always need some for those little gifts given at Christmas. So today I made this lovely Angle Top Label Box - It's a freebie Template in the WMS Shop designed by Claire!  This beautiful ornament fits wonderfully on the top of this pretty box. This box would fit a roll of cash, a gift card, jewelry, or some sweet treats!
 When I stamped the ornament -  I stamped it twice, die cut them both and layered them together to create one ornament stamped on the front and back.  I adhered the ornament to the box with just two foam dots so that it could be easily removed and the ornament could be hung up if desired.  Here's a pic of the back with the foam dots on it.
When I made my box - I used two purple top pieces cut with Labels 16 Nestabilities layered together - but before I adhered them together - I placed tinsel string from front to back between the layers.  I brought the tinsel string on the back down under the bottom so it could be tied in the front to hold it closed.  I also layered a smaller Labels 16 die cut in gold over the top and bottom piece.  Here's a pic.

and here's how it looks from the back when it's tied in the front.
 
The box base is a 2 1/2" square.  This shows the tinsel string tied in a bow in front.
 I dry embossed the side gold panels with the Square Lattice Embossing folder by SU, then wrapped a sheer gold ribbon around them.  This box works up in a snap so you could easily make several of them!

We'll all be back tomorrow for a DT Blog Waltz as we celebrate the new release - and all of the stamps we've been previewing will be available to purchase!  Whoo hoo!!  Which ones are YOUR favorite??  Woodgrain Backgrounder, My Heart, Woodenheart Alphabet, or Ornate Ornaments???

The waltz will begin at 2 pm EST tomorrow - to allow Claire time to reset the store with the new sets.

Now I'm off to see what the other DT ladies have created with these beautiful Ornate Ornaments!!  Are you coming with me???

Bonnie Sharp Sarah Martina Parker Tosha Leyendekker Kelly Schirmer Sandie Dunne Clare Buswell Julia Aston Laurie Schmidlin Jennifer Holmes Claire Brennan

Stamps:  Waltzingmouse - Ornate Ornaments (available 12/1)
Paper:  White, Royal Velvet - PTI, gold - Canford Card
Ink:  Memento Grape Jelly, Versamark
Accessories:  Angle Top Label Box Template - freebie in Waltzingmouse shop, gold embossing powder, hot gun, foam tape, Scor Tape, gold sticky pearls - Michaels, tinsel string - Prairie Bird Boutique Etsy Shop, Square Lattice Embossing Folder - Stampin'Up, large oval punch - SU, Heirloom Ornaments 2010 Spellbinders, Labels 16 Nestabilities, Gold shimmer ribbon - PTI. 

Thursday, November 29, 2012

Day 2 - WMS Dec Sneak Peek - It's all About Love!

Welcome to day 2 of the WMS Sneak Peeks for the Dec 1st release!   Today we are all creating with My Heart - a sweet Valentine/love set that contains 6 different hearts, a vine and 16 words to use alone or together to create sentiments.  We're also using a wonderful alphabet set called Wooden Heart Alphabet.

For my first creation -  I used two of the hearts and Always from the set My Heart, the woodgrain banner is from yesterday's set - Woodgrain Backgrounder - and the letters LOVE are from the Wooden Heart Alphabet - don't you LOVE the font on these letters - all the curly ends and little spikes?!
 Next - I finally put down the Teal Zeal ink ( !?!) and got the white embossing powder out.  First I embossed yesterday's woodgrain background stamp in white on a red cardstock panel.   Then I white embossed this pretty leafy heart from My Heart and J&K (for Julia & Kent!) from the Wooden Heart Alphabet on a piece of red card stock - cut it out and layered it over the woodgrain with foam tape (like it was carved in the tree!).  Then I just added a piece of red wrinkled seam tape and  tied on a tag stamped with Forever from My Heart using candy cane twine.  Finally I added some little heart gems to the heart and tag.
 And my final offering today -  is a treat bag - that I filled with home made heart shaped sugar cookies and decorated with stamps from My Heart. I stamped the leaf vine on a piece of twill and adhered it around the bottom of the bag with Scor Tape.  I stamped the heart and sentiment on a piece of sticky back canvas and sponged it with Ranger Distress Antique Linen.
I inked a paper doily with Antique linen, layered the canvas heart to it - and adhered it to the bag with Scor Tape.  To finish it off - I added 3 red rhinestones.

I hope you have enjoyed my sneak peeks today!   I'll be back tomorrow for our final sneak peek before the release on Dec 1st!

Now let's go see what the others have in store for us!

Bonnie Sharp Sarah Martina Parker Tosha Leyendekker Kelly Schirmer Sandie Dunne Clare Buswell Julia Aston Jennifer Holmes Claire Brennan

Love Always:
Stamps:  Waltzingmouse - My Heart, Wooden Heart Alphabet, Woodgrain Backgrounder (all available 12/1)
Paper:  white - PTI
Ink:  Memento Teal, Desert Sand
Accessories: foam tape, rhinestones - Kaiser.

J &; K:
Stamps:  Waltzingmouse - My Heart, Wooden Heart Alphabet, Woodgrain backgrounder (all available 12/1)
Paper:  Pure Poppy, white - PTI
Ink:  Versafine Onyx Black
Accessories:  red wrinkled seam tape - Prairie Bird Boutique Etsy Shop, peppermint twine - The Cat's Pajamas, foam tape, hot gun, white embossing powder, heart twinkle stickers - Amuse, tag - Avery/Staples.

I love you More treat bag:
Stamps:  Waltzingmouse - My Heart (avail 12/1)
Paper - sticky back canvas - Claudine Helmuth
Ink:  versafine Onyx Black, Ranger Distress Barn Door and Antique Linen
Accessories:  twill tape - SU, Scor Tape, red rhinestones - Kaiser, paper doily - Ellen Hutson, frosted tin tie bag - PTI (they are currently out of stock)

Wednesday, November 28, 2012

Day 1 - WMS Dec Sneak Peeks - Woodgrain

Welcome to the 1st day of Peeks at the December Waltzingmouse Release - all the new sets will be available on Dec 1st when we have our traditional DT Blog Waltz!  Claire has designed 4 creative sets for us to play with this month!  Today most of the Design Team are presenting - for your stamping pleasure - a wonderful set called Woodgrain Backgrounder - it includes one large woodgrain background and 5 other woodgrain shapes .
For my first card -  I used the large background stamp, the chevron design stamp and the hexagon shape (if you are keeping track - there are 3 more shapes in this set!)  I also used a sentiment from Back in the Saddle - I inked it in two parts and stamped them separately - first the top - Gee Thanks - and then the bottom You're a Real Wing Dinger.

I used this week's WMS Sketch for my card design.
For my second creation -  I used the same Teal Zeal Memento Ink as above (my fav at the moment - you'll be seeing more of it tomorrow!).  For this card -  I stamped the large woodgrain background on white card stock and die cut this cute tree.  I layered each piece of the tree with foam tape. I love how the woodgrain looks on this!
I stamped the panel with a stamp from Pic Nic Patterns - (another great background set!) The sentiment is from 'Twas the Night Before Christmas.

As I alluded to above - some of the Design Team (Belinda, Anya and Lynn) did not receive their new stamps in time to create for the sneaks :(   so they will be presenting after the release - on Dec 2nd, 3rd and 4th! A nice way to spread out the excitement don't you think?!

Here are links to the Design Team that are showing sneaks today:  Let's go see what they have to show us shall we??!!  Tomorrow we'll be sneaking 2 more new sets -  hope you can stop by!

Bonnie Sharp Tosha Leyendekker Kelly Schirmer Sandie Dunne Clare Buswell Julia Aston Jennifer Holmes Claire Brennan

Gee Thanks:
Stamps: Waltzingmouse - Woodgrain Backgrounder (to be released 12/1), Back in the Saddle.
Paper:  Rustic Cream, True Black - PTI
Ink:  Versafine Onyx Black, Memento Teal Zeal, Ranger Distress Weathered Wood.
Accessories:  Saddlestitched Black ribbon - PTI, foam tape, Opaline Half Pearls - Basic Grey

 Believe in the Magic:
Stamps:  Waltzingmouse - Woodgrain Backgrounder (to be released 12/1), Pic Nic Patterns, Twas the Night Before Christmas.
Paper:  white - PTI
Ink:  Versafine Onyx Black, Memento Teal Zeal
Accessories:  foam tape, small snow covered stacker tree die - Dee's Distinctively Dies,  rhinestones - Kaiser.

Sunday, November 25, 2012

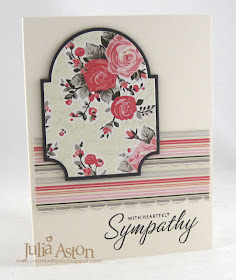
Roses of Sympathy


I made this card for Saturday's Inspiration Challenge over on Split Coast - I was inspired by this lovely Rose Paper by Julie Comstock.

It reminded me of this rose paper I had by Authentique - although it doesn't have a blue background

Unfortunately, I was needing to replenish my stash of Sympathy cards - so that is the sentiment I used on my card.  It was such a clean and simple design - I made 4 of them while I had all the supplies out on my work table!

I used Mega Mat Stack dies from PTI and a scallop punch from SU.  The framed floral paper die cut is adhered over the striped paper with foam tape.

DH and I are spending time in the yard raking again today -  hopefully for the last time this fall !!!

Stamps: Stampin Up - Close as a Memory
Paper: Vintage Cream, Smokey Shadow - PTI, DP Authentique Bundle Collection - Uncommon
Ink: Versafine Onyx Black
Accessories: foam tape, Mega Stack 3 Dies - PTI, scallop edge punch - SU

Saturday, November 24, 2012

Let It Snow!!! (well, maybe not quite yet!!)

Today I have a little wintertime Snowwoman card to share.  I made this for two challenges over on Split Coast -  the Queen for the Day challenge and the Free For All Challenge.

After looking through Queen Sue's (Mrs Noofy) gallery of lovely creations I decided to CASE her Frosty Card  Things I changed: I didn't dry emboss (accept for scoring a frame) and I used a snow woman ( Miranda is her name!) and snow flake stamps from Rubbernecker instead.

I used Stickles for the snow beneath Miranda and embossed my snowflake with a shimmery Moon Glow EP that  qualified my card for the Free for All challenge to add some glitter.

I popped up the snow flake and sentiment on foam tape and used a few Copics to color up Miranda a little bit.

I love seeing all the sweet snowmen and women on the wintery cards people are posting - but I'm happy to keep the snow on the cards for a while!  We haven't even gotten all the leaves raked up around our house yet!

Stamps: Rubbernecker - Miranda, Snow Flake, Let It Snow
Paper: white - PTI
Ink: Versafine Onyx Black, Versamark
Accessories: Copics: BG10, B45, YR04, E31, Moon Glow Embossing Powder Angel Wing/Sapphire, Stickles - Crystal Ice, Scor Pal, small oval punch - SU, foam tape

Friday, November 23, 2012

Stamping instead of Shopping!

So are you shopping today on Black Friday??  For those of you not in the US -  the day after Thanksgiving has become THE day that everyone rushes to the malls to do their Christmas shopping - and all the stores have huge sales starting in the wee hours of the morning.  The stores count on this one day to keep them 'in the black' (ie showing a profit) for the year.  Personally -  I don't go anywhere near a store on this day - I cannot stand the crowds!

I did take a vacation day from work today - but instead of shopping -  I will go out for a walk to work off some of the turkey and trimmings - and will probably do a little stamping as well!

Today I have 3 cards I made using stamps from Rubbernecker  for last weeks Inspiration Challenge over at Split Coast.  The site to inspire us was Fishs Eddy.  First I'll show you my card - and then the item that inspired me
I colored in my little village with a Copic to mimic the design on this Pink Willow Sake Cup.


A clean and simple card -  I just stamped the Kolo Berry Branch by Rubbernecker in red and added rhinestones to replicate the design on this clear storage bowl.


And finally, I was inspired by this apron to create this card using the evergreen block stamp from Rubbernecker.  I used Stickles on the branch to give it a snowy sparkle!
So that's it for me -  thanks so much for stopping by.  How are you spending your day ??!

A Sake Cup of Christmas
Stamps: Rubbernecker - Holiday #2 Village (no longer available), Have Yourself a Merry Little Christmas #22-10
Paper: Vintage Cream - PTI
Ink: Ranger Distress Aged Mahogany
Accessories: Copic - E04

Simple Berries
Stamps: Rubbernecker - Kolo Berry
Paper: Vintage Cream - PTI
Ink: Ranger Distress Barn Red
Accessories: rhinestones - Kaiser Craft

Sparkly Evergreen:
Stamps: Rubbernecker - Evergreen Block
Paper: White, Spring Rain, True Black - PTI
Ink: Versafine Onyx Black
Accessories: Crystal Ice Stickles, foam tape, wrinkled seam tape - Prairie Bird Boutique Etsy Shop, swiss dots embossing folder - Provo Craft, Square Lattice embossing folder - SU

Tuesday, November 20, 2012

A Frosty Thank You and Thanksgiving Place Cards

Isn't this a cute snowman Thank You?!   I made him for two challenges this week -  Lee Anne was the Featured Stamper over on Split Coast and I CASED her cute Snow Woman card

For mine - I stamped the front and back of a 5 1/2" x 4 1/4" piece of white card stock with the Vintage Christmas Backgrounder stamp by Waltzingmouse. Then I die cut through both layers of card . I scored the back piece across at the neck and adhered the head pieces together down to the neck with score tape - then the back bends at the score and the snowman stands up. I did cut a piece off the bottom to make it flat as well.

Then I just tied a wrinkled seam tape 'scarf' around his neck, added a rhinestone 'coal' eye and stamped the Thank You from Vintage Garden Seed Packet by Waltzingmouse - love the font on this sentiment!

I thought this would make a great thank you card for those holiday gifts received.

I'm also entering this into this weeks dynamic duos challenge:


I wish everyone celebrating in the US this Thursday a blessed Thanksgiving Day!    

As a final shot - thought I'd share some simple Name Place Cards I made a friend for her Thanksgiving table.  She's having 18 people (!) so I made 6 each of 3 designs for her.  She will write in the names in the blank space. I started with a 4" x 4" piece of card stock folded in half. I drew the framing with a fine tip pen.  The images are stamped on linen vellum and colored with Copics, layered to a larger colored circle and adhered to the cards with foam tape.
I think these will make for a very festive table don't you?!

Frosty Thank You: 
Stamps: Waltzingmouse - Vintage Christmas Backgrounder, thank you from Vintage Seed Packet
Paper: white - PTI
Ink: Memento Teal Zeal, Versafine Onyx Black
Accessories: wrinkled seam tape - Prairie Bird Boutique Etsy Shop, Rhinestone - Kaiser Craft, Snowman Die - Winter Wonder Tim Holtz/Alterations 

Name Place Cards:
Stamps:  Waltzingmouse - Salt box house from Blessed by You, Maple leaf, Happy Harvest and Happy Thanksgiving from Peace and Plenty,  Inkadinkado - pilgrim hat,  Lil' Inker Designs - Thankful for you from Thanksgiving Wishes set.
Paper:  Linen Vellum (images stamped on this), rustic white, royal velvet, canyon clay, dark chocolate - PTI
Ink:  Memento Rich Cocoa, Archival Coffee.
Accessories:  Copics - N2, YR07, YR23, C6, fine tip brown pen - Creative Memories, foam tape, 1 1/2 " circle punch - EK Success, 1 3/4" round punch - SU.

Monday, November 19, 2012

Peace to the World - WMS Forum Nov Christmas Challenge

Hi Stamping friends!  I have a Christmas Card for you today -  and I'm happy to say I now have enough cards made for my Christmas Card List!  
Yes siree - I've been making Christmas cards every month since January with the Waltzingmouse Christmas Card Challenge in the Playroom of the WMS forum. I usually make 3 or 4 of the card I make each month but this time I just made one since I'm at the finish line!

This month Lynn's theme for us was to use a source of light on our cards (candles, moon, lights etc)
For my source of light I used this pretty lantern from Little Lanterns.  The sentiments are from Say It Loud -Winter Holiday and the background is stamped with the beautiful Yonder Star Backgrounder.  I sponged the edges with Ranger Distress Shabby Shutters.

After I did my stamping -  I applied Crackle Accents by Ranger to the glass part of the lantern and on the Peace sentiment banner.
It creates a lovely crackled look but it did 'blurr' the ink on the candle and flame a little bit.
I was going to use the big word JOY from Say It Loud with the smaller words "TO THE WORLD"  but decided to go with the Peace instead.
Are you done with your holiday cards yet??!!
Come join us in the WMS Forum every month and you will be! (well, next year anyway!)

Stamps:  Waltzingmouse - Say It Loud Winter Holiday, Little Lanterns, Yonder Star Backgrounder.
Paper:  White, Simply Chartreuse - PTI
Ink:  Versafine Onyx Black, Memento Bamboo Leaves, Teal Zeal, Tangelo, Dandelion, Ranger Distress Shabby Shutters.
Accessories:  Rhinestones - Kaiser, Nested Pennants - Nestabilities, foam tape, Crackles Accents - Ranger.

Saturday, November 17, 2012

Gratitude - WMS November Blog Party

Today I have a card for the November Waltzingmouse Blog Party - the theme this month is GRATITUDE, and here's my card!


For the background, I inked the Vintage Christmas Backgrounder with 3 Memento Inks - Tangelo, Lady Bug and Cantaloupe.  I stamped the lantern, leaves, candle and flame from Bright Season, cut them out and layered them over the background using foam tape. The sentiment is from Peace and Plenty.

After it was all together - I went over the glass and candle part of the lantern with Crackle Accents by Ranger. And then left it alone over night so I wouldn't touch it and smudge it!  The bottle says it should dry in 3-4 hours depending on how thick you put it on but I didn't want to chance it so left it over night!

 I used today's WMS Sketch for my card. 
We have a blog party every month on the 17th -  the theme is announced on the WMS Blog on the 1st of each month so you have plenty of time to make your card.  I also link to the theme post on my side bar so you can always look there.

If you plan to party with us and haven't already made your card - you have to link up your gratitude card over at the WMS Blog before 1:30 pm EST on Sunday and you have to use WMS stamps.  We hope you'll join us!   One lucky person that links their card will win a WMS stamp set!

I'm off to the WMS blog to check out all the gratitude cards - want to come??!!

Stamps:  Watlzingmouse - Bright Season, Peace and Plenty, Vintage Christmas Backgrounder
Paper:  White - PTI
Ink:  Versafine Onyx Black, Memento Bamboo Leaves, Tangelo, Lady Bug, Cantaloupe, Ranger Distress Dried Marigold.
Accessories:  Crackle Accents - Ranger, Rhinestones - Kaiser, Wrinkled Seam tape - Prairie Bird Boutique Etsy Shop, foam tape, 1/2" circle punch - Marvy Uchida.

Thursday, November 15, 2012

A Little House for Hanukkah - Creations by AR Nov 15th release blog hop!

Welcome stamping and paper craft  friends!   Today I'm excited to be sharing my project made with Adela's cute new template release - House Box and Ornament.
I work for 3 trauma surgeons and they celebrate Hanukkah - so each year I make them gifts of hand made items and home baked goods. I'm always looking for something creative and fun to make for them - and this little house came just in time for my gifts this year! 
I used some glitter white paper (from Michaels) to make the snowy roof and window sills.(they really sparkle IRL but it doesn't show on the pic)  I used a drippy punch from Martha Stewart for the icicles.  I attached a square of silver paper inside the windows.
I silver embossed the Happy Hanukkah and the Star of David.  I tied a piece of Eyelash Glitter yarn through the chimney so the house could be hung up or tied to a package.
You can push out the inside piece of the house and place some treats inside if you like.  Hershey Kisses would be a perfect treat!
Here are the two separate pieces of the house
I also decorated a blue bag (purchased at the Dollar Store - 2 bags for $1.00!!)  I stamped on a wide piece of twill (Wishing you a Happy Hanukkah and a Menorah by Papertrey Ink)  and adhered it to the bag with Scor Tape to be sure it would stay on.  I found these beautifully colored Menorah Candles at TJ Maxx which I will put in the bag along with some home made goodies.  The little house will be hanging on the bag handle as shown.    
I think they will like their gifts!

Now here are the details on how you could win this sweet little template!
HOME FOR THE HOLIDAYS
New Release

Begins Thursday, Nov.15 at 6:00am (EST) 
Ends Sunday at midnight

3 LUCKY WINNERS! 
How to Win: One random comment from each group listed below will be chosen to receive the new template. The more you comment, the greater your chances!

Visit and comment at each blog - one winner chosen from the AR Team

One winner chosen from a comment on the AR FaceBook Page.
The third winner will be chosen from the comments left at Paper Crafts Planet
WINNERS will be announced on AR Facebook page and AR Paper Craft Planets Group
on Monday, Nov. 19

Now let's go see what the other Design Team members did with this cute little house template!
Amy Park  
Julia Aston:    Me!
Sue Kment  

Stamps: on the house - Star of David - unknown, happy hanukkah - Wordsworth,  on bag and candle package - Mazel Tov - Papertrey Ink..
Paper:  sparkly white - Michaels, Blueberry Sky and Spring Rain - PTI, silver paper - Joanne's.
Ink:  Versamark, Memento Nautical Blue
Accessories:  glitter eyelash yarn - Martha Stewart (Michaels), drip punch - Martha Stewart, xacto knife, Scor tape, silver embossing powder, hot gun, circle and scallop circle punches - SU, wide twill - SU, paper bag - the Dollar Store, candles - TJ Maxx.

Tuesday, November 13, 2012

A Box to Make You Smile!

Isn't this the cutest little box?!  It's called a Flat Backed Treat Box and Patti did a tutorial for it  in the Tutorials over at Split Coast. This box is the perfect size for a lip gloss or several Hershey Kisses -  or a roll of cold hard cash!  AND - it works up in a flash!

My image is Sophie Mod Queen - a digi image from The Octopode Factory. The Bless Your Heart is from a new Waltzingmouse set and You Make Me Smile is from PTI.  I used the Monarch Border die from MFT for the piece along the top.

I'll be back on Thurs (11/15) with a fun new template from Creations by AR and on Saturday 11/17 - I'll be attending the Waltzingmouse Blog Party - this months' theme - Gratitude - hope you'll join us!  You can read about it here.

Stamps: Sophie Mod Queen Digi Image - The Octopode Factory, Bless your Heart from Yonder Star Set - Waltzingmouse, You Make Me Smile from Signature Greetings set - Papertrey Ink
Paper: true black, white, Bitty Dot Basics - PTI, pewter mirror card stock - Joanns
Ink: Memento Tuxedo Black,
Accessories: foam tape, Flatbacked Treat box - in SCS Tutorials, Copics - E00, R20, Y21, Y00, BG10, R32, Dienamics Monarch Border - MFT, silver cord - Prairie Bird Boutique Etsy Shop, silver pearls, Michaels, Silver Memories Metalic Marker, heart punch - Marvy Uchida

Sunday, November 11, 2012

From Home to Sea

Wow -  can't believe it's been a week since I posted here - sometimes life just gets so busy!  I have been making cards for Split Coast Challenges however - so I thought I'd share a couple of them here today:

I made this one for last week's CAS challenge - a Pinterest Inspiration - a wonderful pic of the front of a house with white window frames - aqua shutters and yellow/red vines climbing up the building!

I used DP from PTI, my small Madison window and shutter dies and a sentiment from Lil' Inker Designs. I sponged all the edges with Pumice Stone Ranger Distress Ink. And I tucked a little lace curtain behind the top of the window!

My next card was inspired by this hilarious chicken ornament . from the Artful Home Website.

I used a fish named Groucho instead of a chicken (you can see the similarity in images right?!) - paper piecing him with dotted paper and coloring the rest with Copics. My stamps are from Rubbernecker


I added the ocean wave die cut from MFT and some faceted rhinestones for air bubbles!

I've got two blog hops coming up this week - on Thursday 11/15 I'll have a fun new template to show you from Creations by AR - and on Sat 11/17 I'll be participating in the Waltzingmouse Blog Party - the theme is 'gratitude' -  just in time for Thanksgiving (for those living in the US) come join us!

Thanks for stopping by today!

From Our House to Yours
Stamps: Lil' Inker Designs - Thanksgiving Wishes set
Paper: Hawaiian Shores, Rustic Cfream, Text Style - Autumn Abundance - PTi
Ink: Ranger Distress Pumice Stone, Archival Coffee
Accessories: Modern Label Punch - SU, small Madison Window and small Madison shutter - Poppy Stamps, lace, foam tape 

Can't Wait to "Sea" You!
Stamps: Rubbernecker - Fish - Groucho and Can't Wait to Sea You
Paper: white, Hawaiian Shores, Text Style Happy Spots - PTi
Ink: Memento Tuxedo Black
Accessories: foam tape, rhinestones - Michaels, Copics - Y38, RV21, B00, Dienamics Catch a Wave Die - MFT
 

Monday, November 5, 2012

On Mila's Baptism Day!

My beautiful little grand niece, Mila, was Christened a week ago and, of course, Aunt Julia had to make a special card to mark the occasion!
 I found this beautiful digital image through a posting by Daizy-Mae on Split Coast.  It's a digital image from Beccys Place.  Like Daizy -  I printed the image twice, cut out the dress from one and layered it over the first printing.  I colored the image with Copics.  The sentiment is from Special Blessings by Stampin' Up.(I think it's been retired)

Here's what I stamped on the inside of the card using stamps from Bitty Baby Blessings and Everyday Blessings from Papertrey Ink.
Here is Mila (pronounced Mee-la) with her Mum, Dad and Godparents being made Christ's own.


And here she is chillin' out at home celebrating her 2nd month (couldn't you just eat her up!?!)

This is the engraved frame I gave Mila along with her card.


!
 I've given these frames to all the babies in my family so far.  It has all the birth information engraved on it - a wonderful keepsake for them.  I got it at Things Remembered at the Mall.

Thanks for indulging me today!

Stamps: On Your Baptism day from Special Blessings - Stampin' Up, Christening Dress Digital Image - Beccys Place, inside - Babies are bits of stardust from Bitty Baby Blessings, cross from Every Day Blessings - PTI
Paper:  Fabriano Card, Express It white blending card stock, Soft Stone - PTI
Ink:  Memento Tuxedo Black
Accessories:  rhinestones - Kaiser, foam tape, Copics: Y35, YR07, T6, C6, N6, BG10, R00, E35, Oval and scallop edge oval Nestabilities.